A2A
Bring your A2A agents to your users through AG-UI and CopilotKit.
What is the A2A Protocol?#
A2A, or the Agent2Agent protocol, is a protocol introduced by Google for AI agents to interact and collaborate securely in a framework agnostic manner.
CopilotKit fully supports the A2A protocol, connecting directly to A2A supporting agents or meshes with no modification of the agent needed.

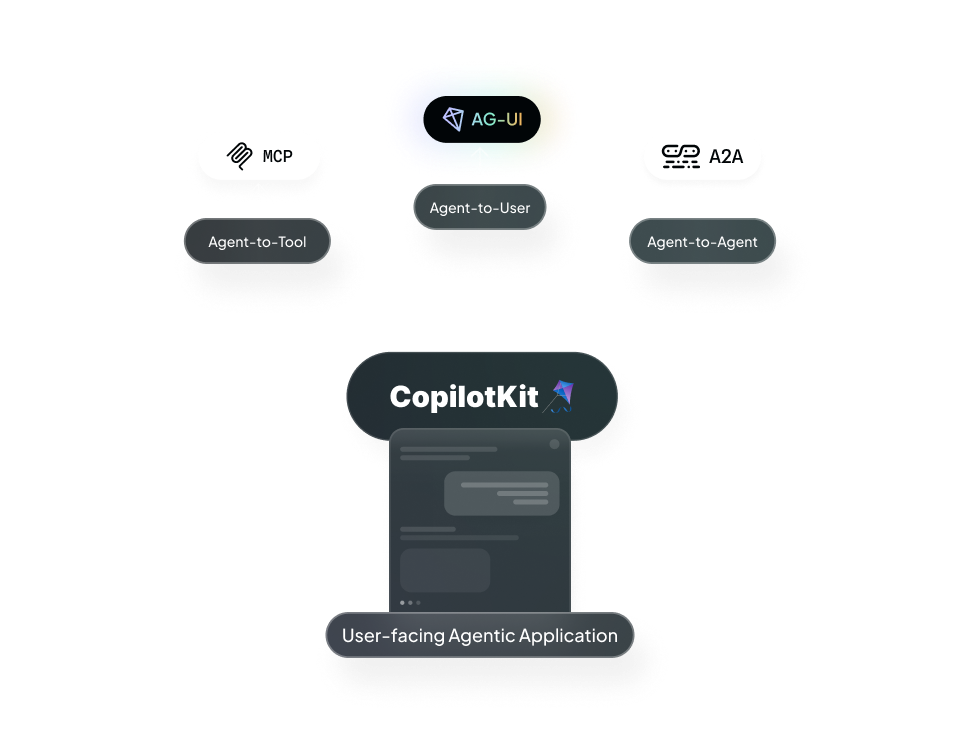
A2A is one of three prominent agentic protocols CopilotKit supports to connect agents to user-facing frontends
How CopilotKit uses A2A agents#
CopilotKit uses a middleware to expose A2A agents to an AG-UI compatible coordinator. This allows you to expose your A2A agents to your users through the AG-UI protocol.
- Flexibility and Interoperability: By making a2a agents available over the AG-UI standard, any A2A agents can work seamless with CopilotKit components.
- Unified Communication: While A2A agents are enabled to communicate with each other over the A2A protocol, AG-UI adds the missing tooling to expose them cleanly to the front end.
To learn more, check out the A2A website.
How to use A2A agents with CopilotKit#
To use A2A agents with CopilotKit, you need to first install the CopilotKit middleware.
Run and Connect Your Agent to CopilotKit#
You'll need to run your agent and connect it to CopilotKit before proceeding.
I already have an AG-UI agent to use as a coordinator.
Excellent! You can move on to the next step.
I want to start from scratch
Run the following command to create a brand new project with a pre-configured AG-UI agent and some A2A agents:
npx copilotkit@latest create -f a2aThis will create a new project with a pre-configured ADK AG-UI agent, but you can use any AG-UI agent you want.
Install the A2A middleware This is already installed for you in the#
project, but if you're adding the middleware to an existing agent, you can
install it with the following command: bash npm install @ag-ui/a2a-middleware
Configure the A2A middleware#
import {
  CopilotRuntime,
  ExperimentalEmptyAdapter,
  copilotRuntimeNextJSAppRouterEndpoint,
} from "@copilotkit/runtime";
import { HttpAgent } from "@ag-ui/client";
import { A2AMiddlewareAgent } from "@ag-ui/a2a-middleware";
import { NextRequest } from "next/server";

// These first two are the urls to the a2a agents
const researchAgentUrl = process.env.RESEARCH_AGENT_URL || "http://localhost:9001";
const analysisAgentUrl = process.env.ANALYSIS_AGENT_URL || "http://localhost:9002";

// And this is the url to the orchestrator agent that will be wrapped in the middleware
const orchestratorUrl = process.env.ORCHESTRATOR_URL || "http://localhost:9000";

// the orchestrator agent we pass to the middleware needs to be an instance of a derivative of an ag-ui `AbstractAgent`
// In this case, we have access to the agent via url, so we can gain an instance using the `HttpAgent` class
const orchestrationAgent = new HttpAgent({
  url: orchestratorUrl,
});

// A2A Middleware: Wraps orchestrator and injects send_message_to_a2a_agent tool
// This allows orchestrator to communicate with A2A agents transparently
const a2aMiddlewareAgent = new A2AMiddlewareAgent({
  description:
    "Research assistant with 2 specialized agents: Research (LangGraph) and Analysis (ADK)",
  // We pass the urls to the a2a agents, the middleware will handle the connections
  agentUrls: [
    researchAgentUrl,
    analysisAgentUrl,
  ],
  // Pass the agent instance
  orchestrationAgent,
  // These are domain specific instructions for the agent. They will be added to the generic instructions on how to
  // connect to a2a agents that will be automatically generated by the middleware
  instructions: `
    You are a research assistant that orchestrates between 2 specialized agents.

    AVAILABLE AGENTS:

    - Research Agent (LangGraph): Gathers and summarizes information about a topic
    - Analysis Agent (ADK): Analyzes research findings and provides insights

    WORKFLOW STRATEGY (SEQUENTIAL - ONE AT A TIME):

    When the user asks to research a topic:

    1. Research Agent - First, gather information about the topic
      - Pass: The user's research query or topic
      - The agent will return structured JSON with research findings

    2. Analysis Agent - Then, analyze the research results
      - Pass: The research results from step 1
      - The agent will return structured JSON with analysis and insights

    3. Present the complete research and analysis to the user

    CRITICAL RULES:
    - Call agents ONE AT A TIME, wait for results before making next call
    - Pass information from earlier agents to later agents
    - Synthesize all gathered information in final response
  `,
});

// CopilotKit runtime connects frontend to agent system
const runtime = new CopilotRuntime({
  agents: {
    a2a_chat: a2aMiddlewareAgent, // Must match agent prop in <CopilotKit agent="a2a_chat">
  },
});

// Standard Next.js App Router handler that hands requests to the runtime.
const serviceAdapter = new ExperimentalEmptyAdapter();

export const POST = async (req: NextRequest) => {
  const { handleRequest } = copilotRuntimeNextJSAppRouterEndpoint({
    runtime,
    serviceAdapter,
    endpoint: "/api/copilotkit",
  });
  return handleRequest(req);
};
Add a useFrontendTool to your Frontend#
Inside the chat component, we'll display the messages between the orchestrator and the a2a agents using the useFrontendTool hook.
The tool the middleware provides for communication is called send_message_to_a2a_agent.
function YourMainContent() {
  // ...

  useFrontendTool({
    name: "send_message_to_a2a_agent",
    description: "Sends a message to an A2A agent",
    available: "frontend",
    parameters: [
      {
        name: "agentName",
        type: "string",
        description: "The name of the A2A agent to send the message to",
      },
      {
        name: "task",
        type: "string",
        description: "The message to send to the A2A agent",
      },
    ],
    render: (actionRenderProps) => {
      return (
        <>
          <MessageToA2A {...actionRenderProps} />
          <MessageFromA2A {...actionRenderProps} />
        </>
      );
    },
  });


  // ...
}
Now we define the rendering for a message sent from the orchestrator to the a2a agents.
Notice that the status can be executing or complete. When it's executing, the orchestrator has sent a message to the a2a agent,
but not recieved a response yet. When it's complete, the orchestrator has received a response from the a2a agent. In both cases, we render the message.
If status is "inProgress", we've been informed that a message will be sent, but it hasn't finished sending yet, so we don't render anything.
type MessageActionRenderProps = {
  status: string;
  args: {
    agentName?: string;
    task?: string;
  };
};

export const MessageToA2A: React.FC<MessageActionRenderProps> = ({ status, args }) => {
  switch (status) {
    case "executing":
    case "complete":
      break;
    default:
      return null;
  }

if (!args.agentName || !args.task) {
    return null;
  }

  const agentStyle = getAgentStyle(args.agentName);

  return (
    <div className="bg-green-50 border border-green-200 rounded-lg px-4 py-3 my-2 a2a-message-enter">
      <div className="flex items-start gap-3">
        <div className="flex items-center gap-2 flex-shrink-0">
          <div className="flex flex-col items-center">
            <span className="px-3 py-1 rounded-full text-xs font-semibold bg-gray-700 text-white">
              Orchestrator
            </span>
            <span className="text-[9px] text-gray-500 mt-0.5">ADK</span>
          </div>

          <span className="text-gray-400 text-sm">→</span>

          <div className="flex flex-col items-center">
            <span
              className={`px-3 py-1 rounded-full text-xs font-semibold border-2 ${agentStyle.bgColor} ${agentStyle.textColor} ${agentStyle.borderColor} flex items-center gap-1`}
            >
              <span>{agentStyle.icon}</span>
              <span>{args.agentName}</span>
            </span>
            {agentStyle.framework && (
              <span className="text-[9px] text-gray-500 mt-0.5">{agentStyle.framework}</span>
            )}
          </div>
        </div>

        <span className="text-gray-700 text-sm flex-1 min-w-0 break-words" title={args.task}>
          {truncateTask(args.task)}
        </span>
      </div>
    </div>
  );
};
Last we define the rendering for a a response from the A2A agent to the orchestrator.
This time, we only render when status is complete, since that means we have a response. In any other state, we don't have a response yet.
If you wanted to, you could render a loading state when status is executing, but you likely wouldn't when status is inProgress, since
we haven't even sent the message yet.
type MessageActionRenderProps = {
  status: string;
  args: {
    agentName?: string;
  };
};

export const MessageFromA2A: React.FC<MessageActionRenderProps> = ({ status, args }) => {
  switch (status) {
    case "complete":
      break;
    default:
      return null;
  }

  if (!args.agentName) {
    return null;
  }

  const agentStyle = getAgentStyle(args.agentName);

  return (
    <div className="my-2">
      <div className="bg-blue-50 border border-blue-200 rounded-lg px-4 py-3">
        <div className="flex items-center gap-3">
          <div className="flex items-center gap-2 min-w-[200px] flex-shrink-0">
            <div className="flex flex-col items-center">
              <span
                className={`px-3 py-1 rounded-full text-xs font-semibold border-2 ${agentStyle.bgColor} ${agentStyle.textColor} ${agentStyle.borderColor} flex items-center gap-1`}
              >
                <span>{agentStyle.icon}</span>
                <span>{args.agentName}</span>
              </span>
              {agentStyle.framework && (
                <span className="text-[9px] text-gray-500 mt-0.5">{agentStyle.framework}</span>
              )}
            </div>

            <span className="text-gray-400 text-sm">→</span>

            <div className="flex flex-col items-center">
              <span className="px-3 py-1 rounded-full text-xs font-semibold bg-gray-700 text-white">
                Orchestrator
              </span>
              <span className="text-[9px] text-gray-500 mt-0.5">ADK</span>
            </div>
          </div>

          <span className="text-xs text-gray-600">✓ Response received</span>
        </div>
      </div>
    </div>
  );
};
Give it a try!#
Try asking your agent to research a topic, like "Please research quantum computing". You'll see that it will send messages to the research agent and the analysis agent. Then, it will present the complete research and analysis to the user.